How to stitch with the Igolochkoy™ Needle
 |
 |
 |
Step One
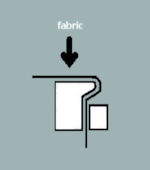
With wrong side up, stretch fabric drum-tight across hoop. Fabric must
not move as you work. If it becomes loose, pull it down over hoop edges
and tighten hoop screw.
(See "Hoop Hints" below) |
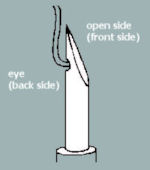
Step Two
Look closely at the pointed end of the needle. Notice that one side is
open and cut at an angle. The other is pointed and has a small eye in
it. The open side must always be facing in the direction you are
stitching. |
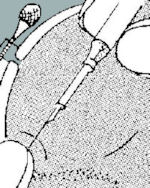
Step Three
To hold needle correctly, rest your hand and wrist on fabric surface on
table, grasp the needle handle with thumb and first two fingers (fingers
parallel to fabric). Place feeder thread over your hand. Never
obstruct or allow any tension on the feeder thread. |
 |
 |
 |
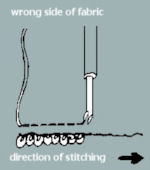
Step Four
Lift needle back to fabric surface without lifting it off the
fabric.
Move a short distance (as little as 1/32") scratching across the
fabric surface, and plunge needle in again. |
Step Five
If the stitches are small enough they will make a continuous line of
loops on the right side of the fabric. After you have done several
stitches, cut thread tail flush at first stitch. |
Step Six
To end stitching, punch until thread is used up or grasp the needle with
one hand and place the forefinger of the other hand on top of the last
stitch and gently pull needle away from fabric. On wrong side of
the fabric, cut all thread ends absolutely flush to the surface. On
right side of fabric, cut thread ends even with the loops. It is not
necessary to knot the ends. |
IMPORTANT: To remove stitches, pull thread out.
Before re-working the area, you must re-align the fabric threads to erase holes
left by the stitches removed. Do this by scratching across the fabric with the
needle or your fingernail. Do not re-use the thread. Cut used portions odd
before resuming stitching. Failure to do either of the above will result in
stitches not holding.
Practice spacing stitches and rows of stitches. The smaller the stitches are,
the more space you may have between rows of stitching.
For best results, rows of stitching should follow the contour of the shape being
filled. Check the finished side frequently.
 Hoop
Hints Hoop
Hints
1. Place inner hoop on table with Super-Grip Lip up.
2.Place fabric with design side up
3.Turn adjustment nut on outer ring to the very end of the screw post
4.Place outer hoop over inner hoop with fabric (step 1 & 2 and push down on
table
5.Pick up and gently push lip up over outside ring.
6.Adjust nut to moderate tension to keep both hoops from falling apart
7.Alternately pull fabric taut and tighten nut until fabric is drum-head tight.
This may take many times around the hoop, pulling hard each time to reach the
correct tension in the fabric. Try not to distort fabric grain and design
8.While working, keep tightening the fabric. The tension of the fabric in the
hoop makes your stitching easier, faster and more even on the right side (pile
side)
If you want to add texture to your work quickly, use any
of the three sizes of IGOLOCHKOY TM punch needles and any kind of thread that
fits. Recently, I used the 3-strand punch needle with two strand of white rayon
thread plus one strand of Sulky iridescent metallic thread to punch the fur on a
cross-stitch Santa's hat.
I punched in each hole and between each square (using a hoop of course) on 14
ct. black Aida. In order not to look like rows, I then came back between the
rows. Ordinarily, you can move your hoop across your punched, loop stitches and
then steam them back up if flattened--not if you are using a metallic--the hoop
will leave a mark on your finished work.
When using the new DMC rayon in the punch needle I used a wet sponge on both
threads. Stitching with it damp is much easier.
When working on any dark color fabric for cross-stitch,
put a white pillow case on your lap or clamp a light on a table to shine up
under your work. I use the airplane window behind my work for light since I'm in
the air a lot!
When a pattern calls for a tassel, use a pre-made one.
Pull the tassel end through the fabric with a small crochet hook from front to
back. Secure with needle and thread on the back side.
For Needlework help, tips or tricks especially Russian
Punch Needle questions, you can send me an e-mail using the
contact form.
|
|
|
|
|